Tuesday, August 28, 2012

Getting a Grip

In our daily quest to become more environmentally conscious I have switched from using a gas powered mower to my wife's push mower. It is quiet, costs less to buy, operate, and maintain, it doesn't create carbon monoxide emissions, helps free us from our dependence on foreign oil, and I can always use a little more exercise.

Unfortunately, the handle grips had worn out and torn on the push mower. As I mowed it would without fail hit a stick or thick weed, jamming the blade, causing the mower blade to stop, causing the handle grip to slide off, inevitably driving the exposed handle into my groin. Needless to say, this upset me greatly and gave me the proper motivation to fix the problem.


I had the great idea of replacing the grips with pieces of an old garden hose. The problem is that the hose is slightly smaller than the handle. I boiled some water to soften the hose hoping it would stretch enough to fit. I sprayed the handle with a silicon lubricant to help get the hose on. This failed miserably. Picture trying to stuff a marshmallow through a keyhole. After about an hour of struggling with it I had it about half way on. And the hose had cooled by this time and wasn't going to come back off the same way it went on. So I set the project aside and hadn't mowed the lawn since.


Then my dad gave me his pipe threader. Either because they don't have pipe in Hawai'i or because it costs to much to ship. So I threaded the handles like a screw. At this point it had to work, 'cause there was no undoing this. I used a heat gun to keep the hose pliable and set about threading the hose onto the handle. It still didn't go easily. 


As you can see there are about 70 threads and each time I rotated the hose about 90 degrees. So it took about 560 turns to get both handles on. It gave me a blister and my hands are very sore. But I got them on and the world is a better place for it. Next time I think I will go to the Boise Bike Project and find some used bike handle bar grips. It just wasn't worth the time or labor to do this since it took me over an hour and now I don't have an excuse to not mow the lawn.


Saturday, August 25, 2012

Gore Darber

Several months ago my new 'rents-in-law took an amazing vacation to the Amazon jungle and then to the Galapagos Islands. While they were away we had a storm sweep through the valley that struck their patio furniture with great vengeance and furious anger, breaking the glass table top. Well "breaking" is a bit of an understatement. I'm not even sure "shattering" does it justice. Picture a car windshield in all those tiny little bits. When I saw the table frame my wife said "Can you kindly make me a gourd arbor outta this?" I said "Hey, I just had a great idea. I bet I can make a gourd arbor out of that." And I did. 

But wait! Let me tell you about it, and include pictures!

This project was very easy. It probably took me 20 minutes to make and 10 minutes to stick it in the ground. My wife and I had wanted to plant some birdhouse and dipper gourds this year and we need something for them to grow in/on/around. This table was perfect!

Side story - Last summer I got a steal of a deal on some cedar fence boards (only 40 cents per (compared to $1.60 at Home Depot)) so I took all that they had left. The wood had been stacked on two 10 foot cedar 4x4s, so I asked if I could have those as well which they were happy to throw in since they had been sitting in the mud. 

I simply drove four 3" deck screws threw the table frame and into the 4x4s. At the base I took two 4" scraps of wood left over from the Greatest Cat Condo Ever Built and drove a handful of screws from the Brother Printer every two inches. Then I ran some hemp string from the screws to the inner leg support for the patio table. Finally, I dug two holes and planted the arbor about two feet deep. Easy as pie!

I don't know if any of you have ever grown gourds. If not, I highly recommend you do. They are a fascinating plant! The leaves are huge with beautiful patterns and they grow in a sort of funnel shape in a column. When it rains the water flows from one leaf and funnels down to the subsequent leaves. When it's hot, the leaves wilt and hang limp, but as soon as the temperature drops in the evening, they perk right back up. We planted 12 birdhouse and 12 dipper seeds and only got five plants. As you'll see, that was more than enough. At first we didn't think they would grow at all because they took 21 days to germinate. 


They have these little finger things that grow straight out and they rotate until they touch something. When the do, the rotating motion causes them to start wrapping around the object, coiling up, and drawing the plant up against what ever it has grabbed.


Once the little fingers grabbed hold of the hemp twine it was ridiculous! On one strand from one plant on one random day we measured 10" of growth in 24 hours! In the past month they have grown from the ground to the top of the arbor (8 feet) back to the ground and as much as 6 feet along the ground! 


Here's what it looks like now. I'm guessing we're gonna get around 100 or so gourds outta this thing. And it's still growing. It's grabbed hold of the tomato plants and the fence and whatever weeds were sticking outta the ground. Soon it will have breached the patio and started up the trellis.

 And here's what the gourds look like right now. In a couple of weeks I'll update this and show you what we've done with the gourds!
Birdhouse Gourd
Dipper Gourd

Sunday, July 29, 2012

LP Bowls

I figured I'd better get in at least one post this month. I haven't finished many projects this month since I went from being unemployed and unmarried to employed and married. Being employed has cut drastically into my spare time. And weddings are an unbelievable time suck. It's been exhausting watching my wife write thank you notes and put our wedding albums together. I offered to help but apparently my handwriting can only be read by chickens and seers.

I have moved several projects to near completion, but am not ready to post them just yet. On the horizon are a solar oven which works pretty well, but I want to make it hotter, and a very cool gourd hanger/grower thingy made from patio furniture. I'm just waiting for the gourds to finish growing. Stay tuned!

Briefly back to the solar oven - I've built one and it was plenty hot for my latest project - bowls made from those old records that my parents had. One, of which, I made the cubicle clock from. I have an old meat thermometer that I'm using to test the temperature in the oven. The thermometer only goes to 160 degrees (which I find quite odd since that's the minimum temperature meat should be cooked to) and the oven will peg it. Pointless story short, I haven't the foggiest idea how much hotter it gets in there.

I did say I'd share my projects, warts and all, so here is one of the warts. It was my first attempt at making a record bowl in the solar oven. I tried setting the record over a mixing bowl with a peanut butter jar full of water on it for weight. Very little went well. It folded weird, the jar tipped over, I punctured it, etc. On a positive note,  future generations will not be subject to this Fred Waring and the Pennsylvanians recording. You're welcome.

Since my first attempt was clearly unacceptable (no one in their right mind would pay $19,105 for that abomination) I had to come up with a better way to make the bowls. I made a template with a scrap 1/2" wood dowel and a piece of particle board that broke off of the Greatest Cat Condo Ever Built (it has since been replaced with plywood and the Tundra Hog kitty has been put on a diet).


The second time around I placed the record on top of the dowels and put the weight in the center. I closed the lid and in about five minutes the result was a very pliable record. I can tug on the sides and move the record around to the position and shape that I want (within the strict constraints of six wood dowels and physics (I'm pretty sure I can shape a gravy boat, though)). Then I remove it from the oven and wait one or two minutes for the record to cool and harden.


The final result is much more acceptable. This bowl is clearly worthy of its "Stereo Gold Award." Although, kitty is not so sure of it. She's under the impression that this bowl doesn't hold as much food as her last one.


Sunday, June 24, 2012

Wheelbarrow Thing-a-mah-doo

We don't have a garage and my work shop is (no exaggeration) 9' x 12'. We have no place to put our wheelbarrow so this is how we've been storing it.

This morning I was watching 'This Old House' and they showed a very clever, but complicated, way of storing a wheelbarrow. It involved latches and bolts and other things I found completely unnecessary.

So I simplified it and stuck the wheelbarrow to our fence.


I took two scrap pieces of 4" cedar fence boards, created a 1/2' lip with them and screwed them to the fence about an inch below the lip of the wheelbarrow.


Instead of purchasing and installing a latch to hold it in place I simply used a 3" scrap of wood, a 1 5/8" wood screw, and two washers from the Brother Printer I took apart.


Now, I simply wheel the barrow up to the base block, tip it up and turn the latch to hold it firmly in place. It's a complete coincidence that it fits exactly under the top board of the fence.

Next I'll need to do something about the wheelbarrow handles. One has to wear gloves during use or they'll get a fist full o' slivers.

Tuesday, June 12, 2012

Cubicle Clock

 As my parents abandoned moved out of my childhood home to take up more permanent residence in Hawai'i, they discovered that they had amassed a tremendous amount of stuff they didn't need. They had a small collection of records that they had no hope of ever selling at their yard sale. Crap like Andy Williams and the Carpenters. I decided to take them off of their hands so that I can melt them into bowls. But that's another post. I still have to finish making my solar oven to melt the records. Again, another post.

After staring at the records for a few weeks I decided to turn one into a clock. Buried amongst the hot hits of the late '40s was an old 78 record called "Holiday for Trombones." I thought this would make a perfect clock for someone who is stuck on a cubicle farm all day.
A few months ago we had to replace our keyboard when my fiance spilled a glass of beer in it. I saved all of the keys from it hoping to find a nice project for them. This clock seemed like the perfect project. I used the F1-F12 keys for the hours. And since this is a clock for a cubicle, using the "Escape" key for 5 o'clock seemed apropos.

Friday, June 8, 2012

Pur-guh-luh, Pur-go-luh. Let's Call The Whole Thing Off

Pur-guh-luh? Pur-go-luh? It doesn't matter how you pronounce it, someone will correct your pronunciation. I'm not sure which one is correct, and honestly I don't care much since prior to April, I'd never used the word. But with some help from my sister, Kris; my fiance, Lesley; and long-time friend, Doug, I built one. I'd like to say that I used recycled wood from a century old barn or built it from pallets, but I didn't. All this wood came from a lumber yard. And it was expensive. It was $100 just for the brackets and through-bolts. And have you priced lumber lately? A 16ft 2x6 is $25! But I built it for my sister, so she paid for it.

Now, I've never built anything remotely like this in my life. The only thing close are these stairs I built on my fiance's house. My sister took a tremendous step of faith in asking me to build her a pergola. And a giant leap of faith asking me to build her two. Especially considering she wanted them done before my wedding and I had just had back surgery and still can't lift anything.  Anyone weight a green Doug Fir 6x6 lately? Trust me, it ain't light.

Fortunately, I have found a couple handy tools for helping me build things like this. One is the internet. I swear you can find out how to build anything on it. Need a time machine? No problem. The second is 
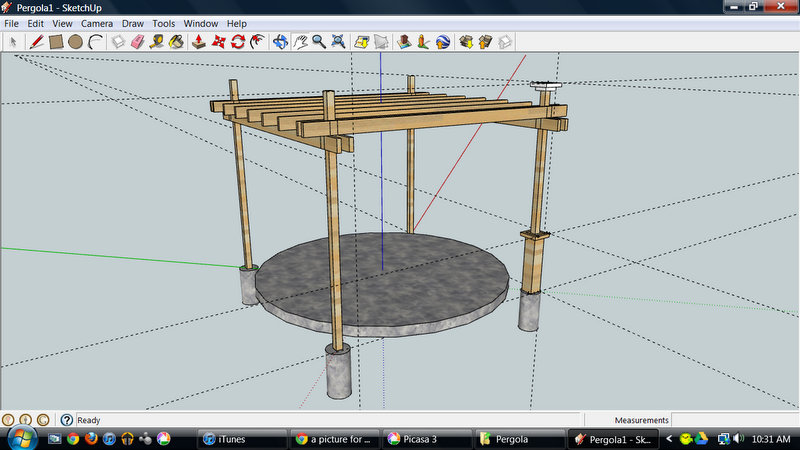
Google Sketchup. If you like to build stuff this is an awesome tool. You can sketch what you're building with Sketchup and then you have all of your measurements and diagrams at your finger tips. It's free and it's invaluable. Here is my Sketchup of the pergola.

Getting the brackets placed right was easily the hardest (hmm... "easily the hardest") part of the whole project. They needed to be exact, and I've never done this before. Once the cement is mixed it starts setting, and then you're committed. I gave myself a ballpark of about an hour before I couldn't move them anymore thinking I'd leisurely measure, level, reset, repeat. Nope. More like 10 mins. So you have to go fast, set all four brackets, and make sure they are square, level, and equidistant. I never did find an easy way to do this so we kinda winged it. But we got everything within a quarter inch of perfect.

Doug was kind enough to dig the holes, drill the holes for the through bolts, and help Kris carry the 6x6s. I know it was hard work and it doesn't help that Doug's back isn't much better than mine and Willard Scott is going to be showing Kris on a Smucker's jar soon, but I am extremely grateful for their help as I would likely be in surgery again had they not been there.

I notched a decorative end to each 2x6 with my Skill saw and then finished the cut with my jig saw that Kris got me for my birthday. I had to get a new jig saw because I have a lot of my grandfather's tools and they no longer make blades for his old jig saw. It's too bad, 'cause that thing was ol' school. It was all stainless steel and shiny. The new one is plastic but it can cut a 2x6 like toast through my fiances skin (if that doesn't make sense to you, you need to ask me about the time my fiance cut herself on a piece of toast. I'm pretty sure her skin is made of meringue).


Once the 6x6s were in place the rest was pretty easy. We bolted 2x6s to each side of the 6x6s for girders and then laid the remaining 2x6s across the girders. I toe-screwed them in place with 3" deck screws at the bottom. Then I ran seven 2x2s across the top and drove a 3" wood screw through and into each 2x6. It's solid as a rock. Three days after completion it withstood 60mph gusts of wind. Kris plans to plant some wisteria around the base of the 6x6s to help create some additional shade.


Wednesday, May 23, 2012

Wine Barrel Hoop Yard Globe


I've made a few neat things out of this wine barrel that I got for $35 off of Craig's List. So far, a few candle holders, a couple clocks, and a wine rack. Since I broke the barrel open I've had several ideas for what to do with the hoops. If I were to cut them up they'd make nice accents on the candle holders or wine racks. I might even find a way to use them to make Roman numerals on the clocks. At this time, I don't have an easy way to cut them up so I decided to use them whole.

The hoops are oxidized and weathered and should make some wonderful yard art, I believe.  Perhaps placed between the jockeys and gnomes, but in front of the crudely painted, not-so-funny, plywood cut-out folk art.

In an earlier post I commented that my wine barrel anatomy was sub par. Not so anymore. Prepare to be amazed:

Since the two bilge hoops encompass the widest part of the barrel they were the outside of my globe. These were followed in succession by the quarter hoops and finally the head hoops. I measured the diameter of the bilge, quarter, and head hoops individually, multiplied it by (go team hold that line) 3.14159 to get the circumference, and followed that up with some wicked division (by 2 & by 4) to figure out where to drill the north and south pole holes in the bilge, quarter, and head hoops, to make the poles fall on exact opposite sides. I used some extra mounting bolts from my TV for the poles. Unfortunately, I didn't have any nuts that matched the thread so I had to run to Home Depot and spend about $2 for a dozen nuts. I place a nut between each pair of the bilge, quarter, and head hoops and tightened the whole business down with my drill. 

To finish it up, I rotated the bilge, quarter, and head hoops to roughly space them equidistant apart, and then tossed it in the flower garden.