Monday, April 30, 2012

Free, Free Log Candle Holders

I made these candle holders from wood outta this guy's => truck. There was a sign next to the wood that said "Free, Free". Not sure why. Extra free, I guess. Hence, Free, Free Log Candle Holders.

Oddly, these are the places I get my inspiration.

You can't tell from the picture on the left, but these have a fantastic, colorful design in the wood grain, as can be seen in the picture below.

These were a snap to build. I used my miter saw to cut them in 3", 5", and 6" lengths. Then I used a 1" Forsner bit in my drill press to drill the holes for the tea lights.

We'll be using these as decorations for our wedding so I'll need many more. However, I have got to let the wood dry out before drilling the holes again. The wood is very green and sappy (but affectionate). This made the wood chips very sticky and they got stuck all over my helper monkey's arm.

This also made it very slow and difficult to drill with the Forsner bit. The bit got so hot that I couldn't touch it with gloves on. That's a good way to dull a good bit, and Forsner's aren't cheap!


Thursday, April 26, 2012

Repurposed Work Bench


This project comes thanks to a local restaurant that did a remodel and was throwing their crap out.During their remodel they were tossing out this old cut table. It's 3" thick butcher block, 36"x30".  Based on the depth of the cheese, chicken, and hog fat, his table held the meat slicer and cheese grater for 35 years or so.


I set about trying to scrape and wire brush this table clean. That was going poorly, as demonstrated by the work accomplished in the top left quarter of the photograph. Actually, "poorly" doesn't aptly describe how it was going. The result was similar to trying to lick cold hot dog fat off of the roof of your mouth. You kinda just push it around and it gets worked into the crevices, and hours later you still taste "meat".


Fortunately, right about the same time I scored this table my wonderful sister-in-law gave me a supa-sweet belt sander for Christmas. So I thought "Gee whiz, I'll give the belt sander a whirl." Actually, what I thought was "$#&! this sucks. If the belt sander doesn't work you're firewood!" It worked real well. As depicted on the left (if you look at the very top of the photo you can see the first stages of the cat condo!). I did have to wire brush the sanding belt occasionally to remove the build up of fat and sawdust (aka "Taco Meat" at Taco Bell).

There are two great things about the build up of fat that was on the table. 1) Near as I can tell, it is completely water proof. It got wet in a thunderstorm and the next morning the water was beaded up all over the surface. And 2) it smells like bacon when it gets hot outside. Pretty sweet, I know. And it gets even better, stick with me.


Now it looks like this.


To stain the wood I spread coffee grounds on it every day for a month. My work bench smells like coffee and bacon when it gets hot. It's awesome! I have the only work bench on the planet that smells like breakfast! Take that Bill Gates ($19,105 if you're wondering, Bill).


Smells like this!

Wednesday, April 25, 2012

A Couple Easy Items

Some of the things I throw together are very simple and only take a few minutes to make.

I've stated before that our house is quite small and finding space can be a bit of a challenge. Which is why the shoe tree has been such a treat. When you only have 625 sqft every foot, square or not, is precious. My dresser drawers are literally only 14" wide. Thankfully, I'm not exaggerating, 'cause if I were they'd only be 12" wide. My point being I need every square inch of space I can get in there. My rolled up belts were taking up space in the dresser that could be occupied by a pair of pants. So I dug through my box of laser printer metal and found this little buddy that each of the toner cartridges somehow were attached to. I think.  
With a couple of screws from said printer, and a heaping helping of convincing, I attached it to the side of my fiance's dresser (which is vastly larger than mine). And just like that, I have room for another pair of pants! Took me all of about 2 mins to mark, drill, and mount.

I do have to be careful of how many things like this I put in plain view in the house. I don't want it to look like a dumpster tipped over in it. Or like a laser printer blew up either. This would have worked nicely on the back of a door for coats or towels, inside of a cupboard for measuring cups or spoons, or even in the laundry "room". But I needed dresser space, so belts it is.

Here's another quick and easy one. I've mentioned a time or two  that I got some cool stuff from a local restaurant when they did a remodel. Their counters had menus under 11"x21" pieces of Plexiglass. They were also throwing out their old touch up paint because they were changing the interior colors. My fiance loves to craft and paint, so she rescued the Plexiglass and paint from ending up in a landfill and suggested we make some art. We laid the Plexiglass out side-to-side on an old drop cloth, cracked open the paint cans, and went to town! Not only did we create some pretty cool art work, but we had a boat load of fun doing it!

Wednesday, April 18, 2012

7 Bottle Wine Stave Wine Rack

I bought this wine barrel off of Craigslist for $35. Now I write the following with all seriousness. If you find it funny, it's not. Stop laughing because it's seriously serious. Seriously.

Craigslist is already a pretty sketchy way to do business. You have no idea what kind of people you might be dealing with on either side of the transaction. When you go to pick up your article, do not, under any circumstances, lock your keys in your truck on their property about a quarter mile behind their house. It looks real, real bad to sit there for 35 mins after the transaction has been completed and they've returned to their house. Unfortunately for me, it was about 35 degrees, with gusting winds. And guess who didn't bring a coat? This required me to hunker down behind my truck to try and stay out of the wind, which I imagine looks exactly like hiding a body. Lucky for me, cops weren't called and my beautiful fiance drove all the way out to Eagle to bring her brain dead future husband his spare key.

Today I built a wine rack using the staves. My original design was to use the two staves side-by-side, but I couldn't get it to look right. It just looked like I nailed some wood together. So I took to the internet and tried to get some ideas. Thanks to Google, I have discovered that I don't have a single original idea in my head. If I think of it, someone else has already built it... better. Vegan zombies? Graaaaiiiiinnns. There was already a shirt. Shower wall hair art? Three blogs. Take a printer apart? Well, that one does seem to be original. Anyway, I killed two birds with this project. 1) I needed something nicer than a cardboard box to display the reception wine. And 2) I needed a groomsman gift for my best man (sorry to ruin the surprise, buddy).


I selected the two widest staves from the barrel then scrubbed them to remove dirt and dead bugs. I took a scrap stave left over from some candle holders I built, and cut it into half-inch dividers to keep the wine bottles from rolling around.


Then, I measured, marked, and glued the spacers in place. Since the wood is rough cut and wine bottles are heavy I didn't expect that glue would hold up if a bottle hit one of the spacers with any force. So I screwed the spacers from the back as well. Normally I would screw and glue at the same time, but since the staves are curved, and I suck at circle math, I glued the spacers before putting in screws. I wanted to make sure that the angle for the pilot hole was perfect.


Here's the finished product. I like that you can see the lines in the bottom stave where the bands protected the oak from weathering. And the natural wine stain adds a very cool touch.


I am aware that several of the bottles on this rack are empty. That's because I'm no wine snob. I don't have a cellar full of wine. I have a trash can full of empty wine bottles.

Friday, April 13, 2012

Pallet Shoe Tree

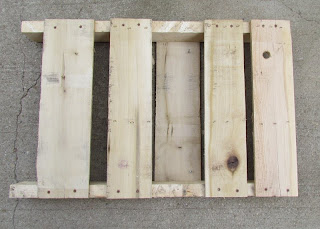
I don't wanna say our house is small, but Google Earth didn't place an address on it because it assumed the house was a detached garage (badump bump, I'm here all week). Due to our diminutive dwelling, we have to be on constant clutter patrol. Our closet is only 6' x 2' and contains most of our clothes. Our shoes frequently pile up by the front door or spill outta the closet. Today I solved that with a small wooden shipping pallet I found lying next to a dumpster.

The pallet was too big to fit into the small area available so I had to take it apart and cut it down to 25"x33". Sounds simple enough. Right? I've taken pallets apart before, but never with the intent of preserving the wood. In the past it was more smashing and chopping until it would fit in the wood stove. I was unaware that they use 3" staples to put those things together. I don't know about the rest of you, but I have difficulty driving a 2" nail into meringue without bending it, I don't have a clue how you would drive a 3" staple into solid wood. It looks from the picture like I could be picking up Mexican (whoa oh) Radio with that staple.

I tried removing the first board with a pry bar and hammer. That resulted in three much smaller boards. So I grabbed my hack saw and began sawing through all of the staples. About 15 minutes and a bloody thumb later, I had dissembled the pallet.

I cut the pieces to the appropriate lengths and reassembled it to the specs I desired. I left a 3" gap at the bottom for boots or shoes that might get scratched by the wood. At the top I put a 1" gap for flippy floppies. The other three gaps are 2". I installed a board on the back to mount the shoe tree to the closet wall and left the middle board off of the front until it had been installed.

I installed it with a couple of dry wall hangers and put the last board in place. This took me about an hour and we now have our closet floor back.

In the last few days I've realized that the dollar has lost any realistic value. Recently several companies have sold for $1 billion. That's million with a 'B'. A phone app (Instagram), 53% of the Yellow Pages (Who even uses that anymore? Seriously?), and 800 of AOL's patents (be honest, did anyone really know AOL still existed? I mean really. There's probably one elderly couple in Kona who just got a CD in the mail and decided it's finally time they get on the interwebs. But other than that.. who uses AOL?) Each of these companies sold for $1 billion! Based on the value/usefulness ratio of those companies I have set the going price for my pallet shoe tree at $1 manillion.

Thursday, April 12, 2012

Laser Printer Spring Gourd Shaker

It may look like it, but I didn't use a random noun generator to name this post. Yesterday I made a gourd shaker with a bunch of the 172 springs from the Brother laser printer.

I knew the awkward day would come when I'd have to share a substandard creation. Not like getting a massage from a T-Rex awkward (picture it, with those short, creepy little arms), but awkward just the same. I did say I'd share my creations, warts and all. And this one has a few warts.

For one, (and I never expected to use these words in the same sentence) the skirt was too short and too tight. So it makes it a bit difficult to shake the skirt. But it looks pretty cool, and if you twist the gourd so the skirt slides around it, it sounds reasonably good I must say.

I bought the gourd last year (and I'm not making this up) at the Idaho Gourd Society Gourd Festival. Remarkably, admission was free. Now, I know what you must be thinking. "Wow, that car must've caused more damage than the doctors let on. He's eating beets and going to Gourd Festivals? That musta been some concussion." I'd like to add that I also attended Tool and Metallica concerts in the last year. I don't know if that redeems me or not. But it's something. Right?

But I digress. The gourd. I bought it for about $4. I washed and scrubbed it, then cut the end off of it to get all the dried seeds and pith to fall out. Since the pieces were too big I put gravel inside of it and shook it like Katharine Hepburn's head. That caused the pieces to break into small chunks and fall right out.

I used hemp string to build the skirt and had to try several different ways of winding them together. There were two very difficult steps to this. 1) hemp string is not woven very tightly and it wants to come undone. When trying to slide a small spring over it, it just gets caught up and tangled. And 2) there was a constant tangle of string and springs. I used clothes pins to try and keep the strings together and prevent them from getting crossed.  All in all, the skirt took me about 1.5 hours to create. Prolly woulda taken 2 hours if I had made it long enough.

I record my videos with my phone, so the audio quality is pretty crappy. This video sounds like I'm dragging a bathtub down an alley. In reality, the shaker sounds much softer than what the video represents. But sans a better audio system, this is what I ended up with.


Tuesday, April 10, 2012

Stop: Hammer Time Clock Works ~ Part Deux

Previously on Stop: Hammer Time Clock Works I mentioned that "you'd be amazed at the things you can turn into a clock." Prepare to be amazed! And annoyed once again by juvenile poop jokes.


I got a number of cool items from Flying Pie Pizzaria (a Boise tradition since 1978) when they did a remodel. I got some tables, work benches, one of those boxes with all the little drawers to hold screws and what not. There were some chairs and benches as well, but I think they decided to Blagojevich those (give it a minute. Nothing? Sell the seats! It's never as funny if I have to explain it.) These clocks were made out of an old dinning table. In hindsight, I wish I had taken a few more of the tables in the land grab because I really like these clocks and they are made from cast iron or pot metal or something like that, so they should be around for quite some time. And, it will probably take me longer to write this post than it did to make the clocks.

This clock was pretty heavy and had to be mounted to a stud. 
I simply ground off the rust with a wire brush and spray painted them gold. I got the movements (just regular torque movements, mind you) for less than $5. The movements mount with one nut and washer (they fit nicely into the back) and take no more than a few minutes to install. The most time consuming part was scraping off the rust.


Since I'm still trying to pay for my recent back surgery the small one on the left is for sale. - $19,105 Any takers?

Monday, April 9, 2012

Laser Printer Wind Chime

With exception to the fishing line, this wind chime was made entirely from the Brother Laser Printer taken apart in this post.  The O-ring and wire on top are from a long cable that held the front access panel while replacing the toner cartridges. The top piece is a machined piece of sheet metal that contained a bunch of rods and gears. It was the closest piece shaped like a circle so I went with it. The rods (that's wind chime talk) were, of course, rods from the printer. I have no idea what the striker was used for. It was in the bowels of the printer somewhere. It had some wires going through it, but it was made of metal. Seemed completely unnecessary to me. But what do I know about printers. Finally, the wind catcher is the largest gear from the printer. 

I wouldn't  have guessed it, but taking pictures of the wind chime was the hardest part. This was the best picture I could muster. I'm no Ansel Adams (I did take classes from a guy who took classes from him), but I like to think I'm a fair-to-Midland photographer. But for the life of me, I couldn't get a decent picture. I tried different back grounds, light, angles, flash, apertures, etc. So, you may have to use some imagination. Come to think of it, I don't recall seeing any of Ansel's wind chime work, so it could be that they are just difficult to capture. On the plus side, you get a rare view of my sparse, spring grass. 

Because of my inexplicable fear of the numbers six and eight, I selected seven rods of varying lengths. I 'spose I could've tuned them with a grinder, but really, I've got better things to do. Actually I don't. But I'm not going to be "playing" it. And honestly, that seems like an awful lot of work. And sparks.


I tied 12lb fishing line to the top of the rods, threaded it through holes in a roughly circular pattern (and when I say 'roughly' I mean like a circle drawn by a 3 year-old), then tied them off to some pins that were used to hold gears in place.

I've got four wind chimes in the back yard (one made from forks, knives, spoons, and driftwood) none of which plays Pachelbel's Canon. This one blends right in visually and acoustically. I think people will be surprised to learn I made it from spare printer parts!


There's no wind today so I had to give the catcher a tug. 


Friday, April 6, 2012

One Printer, One Company, One City

This one is a bit of a long story, and by the end I won't have created anything. However, it is a segue into a few things that I have built with the parts. Which I will cover in future posts.

The company I used to work for was throwing out this all-in-one laser printer. It needed fixed; kept saying there was a paper jam despite the fact there was none. We tried to reason with it, but to no avail. Since repairs tend to cost more than printers and this was the third time it needed repaired, it was determined it was more cost effective (financially, that is to say it doesn't speak for the environmental cost) to just get a new one. The Brother printer was going to be tossed.

My fiance, hoping to save it from the landfill, decided to try and sell it on Craigslist. That failing, I decided to take a few parts off of it before recycling it. I wanted some screws, springs, small motors, etc for my work shop. So I grabbed my drill and set about taking it apart.


At first, I thought "Hmm... there are way more screws and springs here than I need." After about an hour I thought "This thing is an engineering marvel! So many tiny screws and springs and gears working together perfectly. Who comes up with this? Must be some brainy mugs." 8.5 hrs later (and no paper jam, BTdub) I was surrounded by two heaping crates of plastic stuff, one heaping crate of metal things, a box full of motherboards, wires and motors, a large pill bottle full of screws, plus hundreds of gears, rods, springs, clips, and optics. By then I was thinking "This was all headed for a landfill. I'm not even sure that recycling it is sufficient." The amount of material contained within was astonishing.

Here's the laundry list:


~550 tiny screws weighing one pound.


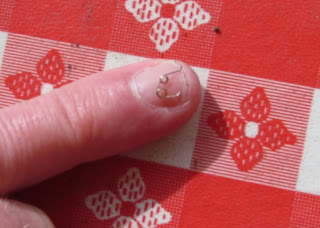
172 springs. This one on my pinky nail is so small it's hard to comprehend (no comments necessary on my need for a mani). I'm thinking about using the printer optics to fashion some real small glasses.


Motherboards, wires, motors, fans, lights, etc.


Glass, mirrors, optics, prolly some kinda laser


Rods, pins, rollers, &c.
142 plastic gears

The table wasn't big enough for all the plastic so I had to lay it out on this table cloth on the lawn. The large open areas are covered with transparent plastic.
Metal

So that's it. One printer, from one (small) business, in one city. There are literally millions of these out there and they're "disposable." If I hadn't torn this one apart, I'd have had no idea.

Anyway, on to my high horse. I started to make stuff outta this printer. So far I've used two screws to attach a light switch cover in my shop, built a wind chime (it sounds very nice) and I'm working on a gourd shaker that uses the springs for the shaky noise things on the skirt. But those will be separate posts. I'd also like to make a picture frame using the motherboards and the scanner glass. If anyone has any ideas leave a comment and we'll see what we can come up with!

Thursday, April 5, 2012

Stop: Hammer Time Clock Works

You'd be amazed at the things you can turn into a clock. Well, you might not be, but I am.

I'm not sure what got me started  on it but I decided I wanted to try making a clock (likely the boredom of recovering from back surgery and desperately wanting something to do). I spent weeks looking for things that would make a good clock. From light fixtures, to dinner plates, to old toilet seats. But nothing jumped out at me until I bought a wine barrel off Craigslist ($35) and broke it open. There on the shop floor, stained burgundy by the wine it held, lay the foundation for my first clock. And, since a wine barrel has a top and a bottom, my second clock as well. And some candle holders, some art work, some wine bottle racks, I'm amazed what one can make with an old wine barrel. But this post is about clocks! I'll get to all that in later posts.

This barrel had been stored outside and had some spider webs and a few old bug carcasses in it. So the first thing I did was rinse and scrub it with a brush. Because the staves (I think that's what they're called, wine barrel anatomy is on par with my spool anatomy) that make up the top and bottom aren't glued or nailed together (it's amazing to me these things don't leak like sieves). I worked some wood glue into the seams to give it some stability and clamped it overnight.

I looked online for some clock parts and learned two things. 1) The size of the clock body would require large hands which would require a high torque motor to move the hands. And 2) it's not called a motor, it's called a movement. Seriously. I found the appropriate sized hands and movement (giggidy) through ClockParts.com and they were quite reasonable (defined as 'less than what I had expected'). About $15 if I remember correctly, but still the most expensive movement I've had (I can't help myself).

I found a neat way to find the center of a circle on YouTube, and drilled the appropriate sized hole in the center. I placed the movement in the hole (this is killing me), traced around it and used my brother-in-law's router to make a pocket for the movement to sit in (I'm done, I swear).

I used some 1/2" shiny silver tiles from a second-hand store (no pun intended) for the 3, 6, 9, & 12 and used silver thumb tacks for the other numbers.

After having made two of these, I imagine I could complete one in an hour or so. The most time consuming part was making sure my measurements for the hour markers were exact. I used a lot of complex math to figure the exact distance between each hour then repeated it to make sure I did it right. Unfortunately, as I write this I'm realizing that if I put the hands on the movement and rotate the minute hand it will tell me exactly where the hour markers go. Note to self.

Also, and I learned this one the hard way, never turn the hour hand on a high torque movement (Seriously?! I'm sorry, I just can't let that one go). It breaks the teeth off of the gears and you have to buy a second $15 high torque movement.

I honestly never expected this to digress into poop jokes. But, come on. High torque movement? That's going to be my new after-coffee euphemism.

Wednesday, April 4, 2012

Quite Possibly, The Greatest Cat Condo Ever Built.

My fiance has a very spoiled special cat. For privacy I will refer to her as Kunta Kitte because I think it's a great cat name. I knew straight away that gaining KK's favor was the key to gaining my fiance's favor (well, GF at the time, but since building this she's agreed to marry me, so draw your own conclusion). This amazing condo is replete with private master bedroom, sunning hammock, three state-of-the-art scratching posts (two carpet, one hemp rope), napping level, two observation decks, and futuristic transportation tube. This thing is, quite honestly, bitchin! I'm pretty proud of myself.

It's at least 90% upcycled. I rebuilt the front stairs and landing on our house and used the old 4x4s for the main supports/scratching posts. I cut off the ends that had rotted and used the remaining good wood.

I purchased some pieces from a place I like to frequent called Second Chance Building Materials Center. There I found the old book shelves which I used for the napping level and two observation decks. Also, two large pieces of particle board (formerly a computer desk) for the base and landing areas, and 10 times more carpet than I needed (it was the remainder of a roll). All for $20. And I donated the remaining carpet back to them to resale.

The private master bedroom is made from my old sub woofer cabinet. It's 17x17.5x15 which is more than big enough for KK to curl up in. The speaker cover is still in place so she can see out but will be undisturbed by kids and what not.


For an unknown reason, my former employer was in possession of an old cardboard 105mm artillery shell shipping container. He was throwing it away and I knew I could make something cool out of it. I cut a hole in the top of the sub woofer and wrapped the tube in hemp rope that I purchased from Home Depot (easily the most expensive portion of the project). I attached it to the landing with a chimney pipe collar, also purchased at Home Depot. This serves as scratching post #3 and the futuristic transportation tube to-and-from the private master bedroom/sub woofer.

The sunning hammock is attached with screws to a 1" dowel rescued from the scrap bin at Home Depot. For ease of entry,there is a 6" hole through the landing above the center of the hammock. She flat out loves this thing and spends up to six hours at a time in it. Probably so she doesn't have to do this anymore.

I removed the rubber "feet" from the sub woofer and put them on the base so that it won't scratch our nice hardwood floor.

Kunta Kitte trucks up and down the levels using the observation decks to spy on cats outside the front window, lounges for hours on the hammock, scratches the heck outta the posts and occasionally hides in the private master bedroom. She's yet to use the futuristic transportation tube. Fear of technology, I assume.